As an Amazon Associate DirtBikePlanet.com earns from qualifying purchases.
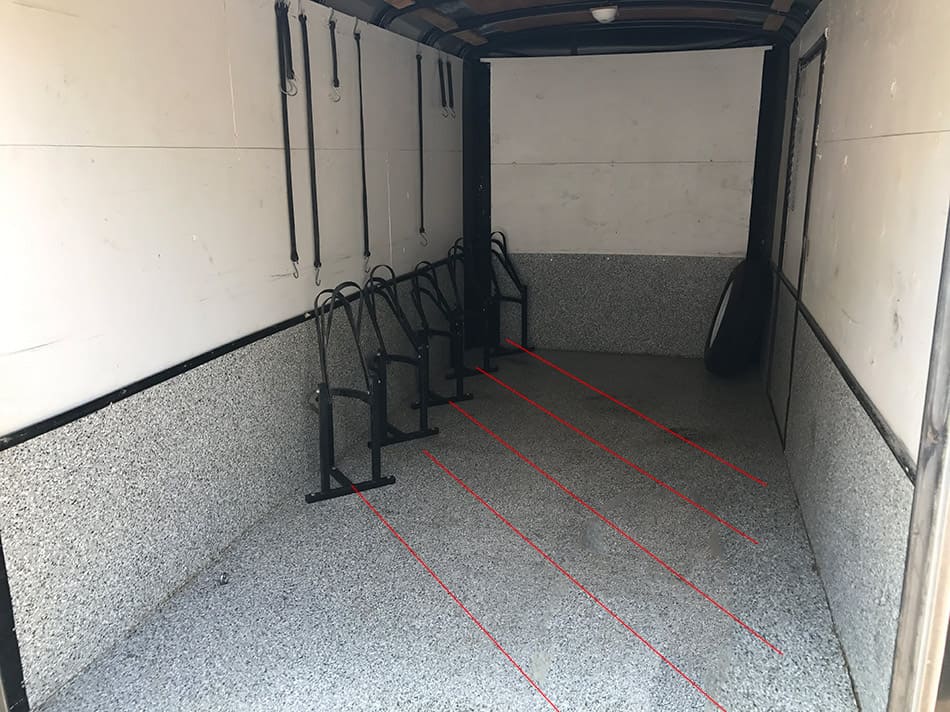
I recently set up my ultimate dirt bike trailer and had to choose some wheel chocks. There are many different types of wheel chocks, so you’d be forgiven for not quite knowing which ones work best.
Worse, there are several videos on Youtube of wheel chocks that seem to show incredible functionality, but that are no longer available on the market. Consequently, I was very frustrated with the process and couldn’t find a good set of wheel chocks.
In the end, I decided to buy these wheel chocks on Amazon.com. They weren’t too horribly expensive, and they work really well. I got four of them for my dirt bike trailer and I absolutely love them!
The purpose of wheel chocks is simply to keep the front tire steady while transporting the dirt bike. Some dirt bike chocks, called “stabilizing wheel chocks” are merely an endpoint to stop the front tire from rolling forward and still require straps to secure the bike. Other chocks are “stand-alone”, meaning they could (in theory, at least) support the dirt bike without any additional straps.
I personally don’t see much of a purpose for the stabilizing-only chocks, and definitely recommend a more secure chock that can stand alone.
Stabilizing-Only Wheel Chocks
Most dirt bike wheel chocks are stabilizing only. It’s basically just a front bumper for the dirt bike wheel. They are usually a bent piece of aluminum that the wheel can roll into slightly. The primary benefit of this type of chock is that it provides a firm front stopping point.
In many dirt bike trailers, a stabilizing-only chock does little to nothing. You can already push the front tire up against the wall of the enclosed trailer, so a chock does little or nothing. However, it does prevent lateral movement of the front tire, which is somewhat helpful.
In other dirt bike trailers, however, a stabilizing chock could be quite helpful. For example, if you have a very long trailer and you want to put the bikes in vertically (along the length of the trailer), then you may have a bike where the front tire doesn’t push up against a wall, so you’d want a wheel chock to provide a firm front stop so that you can keep at least one part of the bike in place, and then you can strap the rest of it down.
Stand-Alone Wheel Chocks
Stand-alone wheel chocks are intended to provide significantly more stabilization than the stabilizing-only chocks. Some of these wheel chocks are even capable of fully supporting the dirt bike with no straps at all; however, from personal experience I can say that there are few stand-alone wheel chock systems that I would trust with no additional support at all.
If the front wheel of a dirt bike is fully and completely secured, the bike can stand on its own and not fall over; however, the backend could fishtail somewhat if you were going over very bumpy areas.
The system that I like the best is to have the wheel chocks from Rocky Mountain ATV that I bought. These totally support the front tire, and you could actually just use these alone, but have seen the dirt bikes come loose from those chocks on very rare occasions. It’d probably only be once every few years that they come loose, but that’s too often for me. I wanted something else to ensure they aren’t going to come loose.
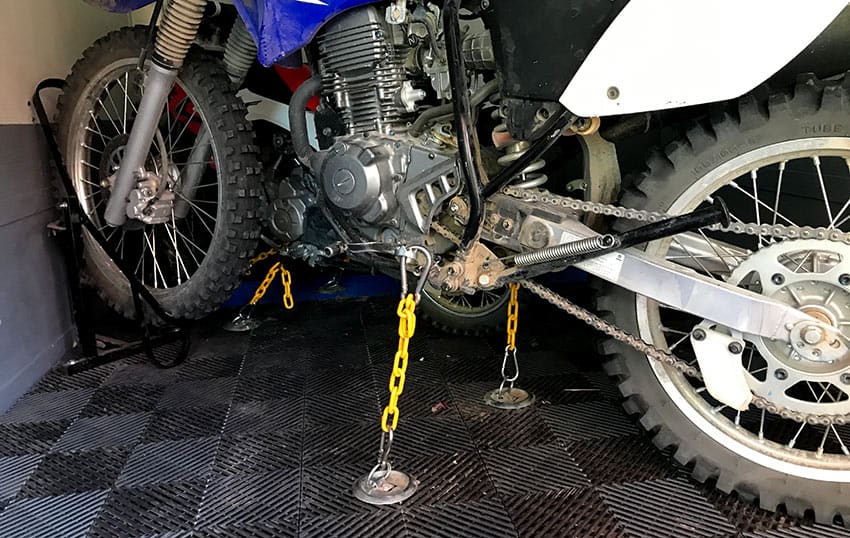
My system is to put the front tire in the wheel chocks, and then secure a chain to the foot pegs so the bike is completely incapable of moving. This way I still don’t have to mess with straps, the bike is secure, and it takes far less time to set up. It’s the best setup for me.
Using the Chained Footpeg Method
My favorite way to supplement wheel chocks is with chained footpegs. You simply attach a D-ring to the floor of your trailer directly under where the foot pegs are on each of the bikes. Then go to Home Depot and grab a 1 foot long section of chain and two carabiners. Attach one carabiner at each end of the chain. One carabiner attaches to the D-ring, and the other to the footpeg.
I have seen some guys on Youtube using only the chained footpeg method and nothing else, but I don’t recommend that. The problem is that it still allows for a lot of sway in the bike. This puts a tremendous amount of pressure on the D-ring and can cause it to pull out of the floor if secured with screws. If your D-ring is secured to the floor with a bolt and a nut underneath the trailer, it puts excess pressure on the floor and could cause cracking in the floor board.
The nice thing about the chained footpeg method is that it puts no compression on the bike’s suspension system. You just secure the chain so it’s taught without any pressure on the bike, and then clip it. This is better than straps, which require the suspension to be compressed, and can lead to broken fork seals quite easily.
It can be tricky to know how to secure and release the bike the first time you use chains on the foot pegs. I have found the easiest way is to stand on the opposite side of the bike from where you’ll be chaining. Lean over the bike’s seat and put your body weight on the bike to compress the suspension and then clip the carabiner. Do the same on the other side. The compressed suspension is only done for the moment you’re chaining up the bike, and then once you stop leaning on the bike, it pops up to its normal height and makes the chain taught.
Another cool thing about the chained footpeg method is that you could use a lock instead of a carabiner on at least one side so not only is your trailer secured, your bike is chained to the trailer. Even better protection. While I personally find this overkill, if you live in a higher crime area, it may be prudent. Dirt bikes are stolen pretty frequently.
Extra Security by Going Horizontal
I recommend going horizontal in setting your dirt bikes in the trailer. If you place the dirt bikes running the length of the trailer, then they can easily roll forward-to-back. However, if you place your dirt bikes sideways in the trailer, then the front and the back tire hit the side walls (in a 6’ or 7’ wide trailer). This gives significantly better security since it’s already tough for the bikes to move around. Then you are just strapping them so they won’t get out of place.
Whenever possible, place the dirtbikes sideways or at an angle so the front and back tires hit the walls of the trailer.
In Conclusion
Everyone has their personal favorite way to secure dirt bikes. The vast majority of people just use straps, but I personally much prefer something a little more secure and advanced so that it’s faster to secure the bikes, the bikes stand less of a chance of moving, etc.
Enjoy your dirt bike adventure!