As an Amazon Associate DirtBikePlanet.com earns from qualifying purchases.
I’ve spent the last week deciding how I can set up my dirt bike trailer so that I won’t have to spend 15 minutes strapping down all of our dirt bikes each time. I want a strapless solution that will be easy and secure.
There are dozens of products on Amazon and elsewhere that have been invented over the years, but they all seem to have gone out of business. There just isn’t one clear winner.
However, I have found a solution that works really well for me. I secure the front wheels with these AMAZING clamping wheel chocks (available on Amazon.com), and I clip ties to my foot pegs. This method allows me to secure my bike in under 30 seconds, and I have no fears at all of the bike coming loose in transport.
This solution has proven to be far superior to using tie-downs and strapping my bike each time. Ties put pressure on the forks and have a tendency to wear through fork seals. This method puts no pressure at all on the forks so it’s better for the bike, and I would argue is more secure.
The Wheel Chocks I Use
I spent a lot of time looking for the right wheel chocks. You can get really cheap wheel chocks on Amazon that basically just provide a slight stabilization to the front wheel when you roll it in, but they don’t accomplish much. You still have to strap the bike down.
Another option is the type of wheel chocks where you roll the bike in and the chocks slightly cup the wheel. While this gives a little more stabilization, it has the same problem. You still have to strap down the bike. The chock only holds the bike steady for you as you strap it down. In my opinion, this isn’t even worth having.
Then, I went to buy a trailer from a guy on Craigslist who turned me on to these awesome wheel chocks. They are taller than normal chocks and they have a piece which comes over the top of the wheel to lock it in place. You push the bike forward into the chock and then lay the top piece over the tire, which grips the tire and doesn’t let it roll backward. They’re really great.
Another thing I like about these chocks is that they come in two different sizes. One size is for smaller bikes with 14-17″ wheels, and other for full-size 19-23″ tires. This works perfectly for me because I have two kids bikes: a 50cc dirt bike for my 6-year-old, and a 110cc dirt bike for my 8-year-old. Technically 50cc dirt bike is too small for the chocks to work correctly, but I still use it as a way to support the front tire and I use the foot peg ties to secure the bike.
Some people use these chocks alone without any other support, and have good results. I even heard from a guy that drove cross country without any problem using only these chocks.
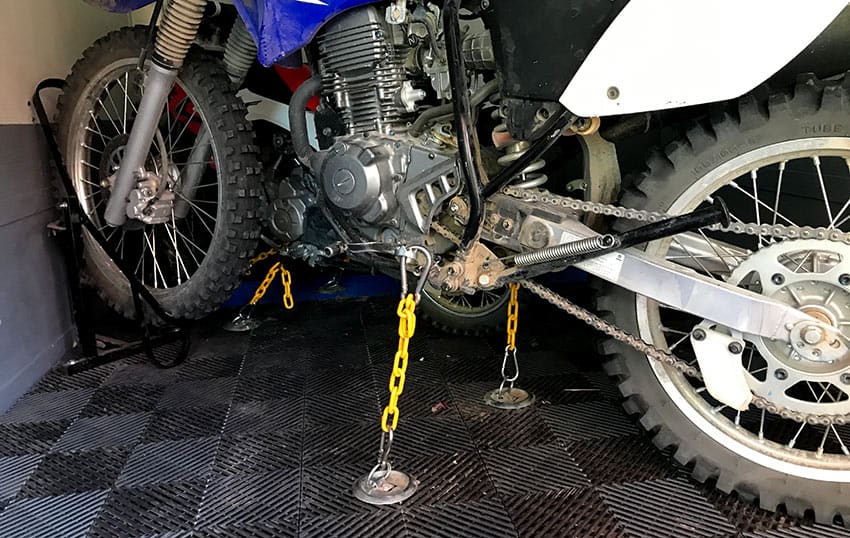
However, I also heard from a guy who once had a bike work its way loose using the chocks. It was just one time in 5 years of use, but his experience was enough to convince me to use a belt-and-suspenders approach. So now I roll the front tire into the chocks, and then I attach a short bungee to my foot pegs. With this system, I feel like it’s basically impossible for anything to happen to the bikes while in transit.
Securing the Foot Pegs
By attaching some sort of tie to the foot pegs, you keep the bikes from rolling back out of the chocks. This could really only happen if you hit a series of bumps and somehow the bike worked itself loose, but it’s good to be certain your bike is secure.
There are a few ways to do this. All of these methods attach to the floor of your trailer, and then clip onto the foot peg.
- A short rubber bungee attaches to the floor of the trailer on one end, and on the other end it clips onto the foot peg
- A short metal chain secured to the floor on one end and then on the other end, a carabiner hook like these (Amazon link) that clips onto the foot peg
- A metal turn buckle (Amazon link) connected to the floor on one side, and clipped onto the foot pegs on the other end
- A trampoline spring (Amazon link) attached at one end to the floor and the other end to a carabiner that clips onto the foot peg
- A carabiner attached to the floor of the trailer, and then a simple webbing loop (Amazon link) that goes from the carabiner through the foot peg, and then the other side loops back to the carabiner.
All of these solutions will work just fine for securing your foot pegs. When you do this project, keep in mind that the length of the connection doesn’t really matter. You don’t have to worry about the chain (or webbing or trampoline spring, etc) being precisely the perfect length. If it’s long enough to reach the foot pegs from the ground, you’re okay. You’ll want this connector to be attached to the ground in front of the foot pegs, so you can set the angle according to the length of your connector.
You may be wondering how you can connect the chain, turn buckle, or webbing loop to the foot pegs since those connectors don’t have any “give” in them. You’ll simply lean over your bike to compress the forks and connect the ties, then when you stand up, the forks can decompress to their full extended height. So the forks are compressed as you’re connecting, but then they are not compressed at all during transport or storage. Perfect!
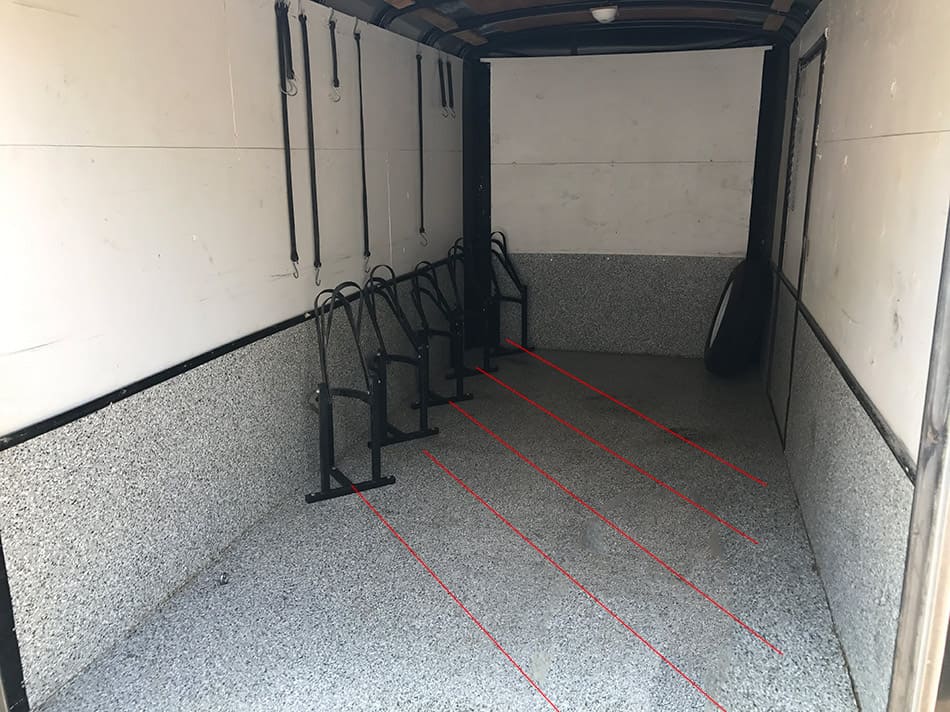
Putting this System Into a Dirt Bike Trailer
If you’ve read my article on picking the right size of dirt bike trailer, you have already seen photos of this system in use. The wheel chocks just go off to one side of the trailer and the bikes are loaded at an angle. This maximizes your storage space in the trailer, and keeps the wheel chocks out of the way as you walk around.